I made these early this year so I could show you how to do it! It was a lot of fun and not as hard as I thought it would be. I originally found this on the Not Martha Blog that a friend posted but I did things a little bit different.
EMPTYING THE EGGS
I took a push pin and poked a small hole in one end of the egg. I took a pair of nail scissors and carefully cut a bigger whole around the bottom and tried REALLY hard not to crack the whole egg. The trick is to keep your hand really steady and move around the circle slowly. Make the hole big enough so that you can fit fun little treats inside. I accidentally grabbed large eggs instead of jumbo ones which would have worked better because I could have fit more things inside. I emptied the inside of the eggs into a bowl so I could put a lid on it and use them later. After I emptied them I rinsed them out really carefully and even stuck my pinky finger inside of them to make sure there was nothing left inside. I then put then in a saucepan and boiled them for 10 min and then moved them to a bowl of ice water to cool them down.
DYING THE EGGS
If you’re going to dye the eggs you can do this right away. If you’re not going to dye them hang them to dry as I show below, overnight at least. I was trying to match the color of some Robin’s egg blue caramels I found and did a number of different trials combining various McCormick’s food coloring combinations. In the end I found that this was just about perfect:
I lowered and lifted the eggs using skewers, and dried them on this tree I made using skewers and a styrofoam cone I had in the house. Catch drips at the bottom of the eggshells with a paper towel. Let the eggs dry overnight.
EMPTYING THE EGGS
I took a push pin and poked a small hole in one end of the egg. I took a pair of nail scissors and carefully cut a bigger whole around the bottom and tried REALLY hard not to crack the whole egg. The trick is to keep your hand really steady and move around the circle slowly. Make the hole big enough so that you can fit fun little treats inside. I accidentally grabbed large eggs instead of jumbo ones which would have worked better because I could have fit more things inside. I emptied the inside of the eggs into a bowl so I could put a lid on it and use them later. After I emptied them I rinsed them out really carefully and even stuck my pinky finger inside of them to make sure there was nothing left inside. I then put then in a saucepan and boiled them for 10 min and then moved them to a bowl of ice water to cool them down.
DYING THE EGGS
If you’re going to dye the eggs you can do this right away. If you’re not going to dye them hang them to dry as I show below, overnight at least. I was trying to match the color of some Robin’s egg blue caramels I found and did a number of different trials combining various McCormick’s food coloring combinations. In the end I found that this was just about perfect:
- 1/2 cup white vinegar
- 4 cups boiling water
- 24 drops neon blue
- 6 drops blue
I lowered and lifted the eggs using skewers, and dried them on this tree I made using skewers and a styrofoam cone I had in the house. Catch drips at the bottom of the eggshells with a paper towel. Let the eggs dry overnight.
COATING THE EGGS WITH CHOCOLATE
I used Milk Chocolate Almond Bark and followed the directions on the package. I added vegtable oil to the chocolate to make it thinner so it would pour into the egg easier. I put the melted chocolate into a pyrex measuring cup because it had a spout to make it easier for pouring. You can actually melt the chocolate right in that if you use the microwave instructions.
I inverted the egg onto a small salt bowl, poured melted chocolate inside catching drips with a small silicone spatula, then immediately turned the eggshell to coat the inside and let the excess drip out, back into my measuring cup. I put the egg on a drying rack to let excess chocolate drip out and did the next egg. I set the eggs in the fridge for an hour or so to let the chocolate set.
WRITING ON THE EGGS
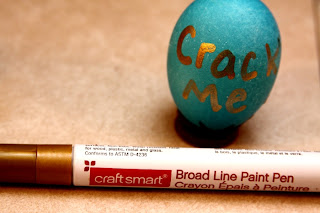
I bought a gold paint pen from Michaels and wrote the words 'Crack Me' on the outside of the egg.
FILLING THE EGGS
I saw a very clever idea on the blog were she had filled her eggs with fun little trinkets and candies but since I had the smaller eggs I just chose to use chocolate covered sunflower seeds that were colored. You can use anything that you think you can fit in the egg.
Now the trick is to seal the eggs shut. I warmed a knife in a saucepan of water, wiped it dry and ran it over the opening of the egg, melting the edges of the chocolate while making the surface flat. Then I pressed a molded chocolate into the bottom.


Wow! I am so impressed!
ReplyDeleteThank you! I was pretty proud too but nobody cared about them! I had to throw most of them in the garbage. hahaha
ReplyDelete