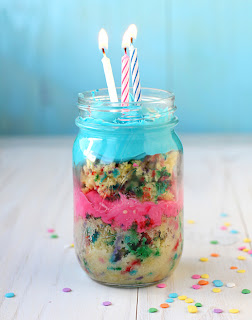
Birthday Cake in a Jar
- 1 yellow cake mix, prepared according to package directions
- 1/4 cup rainbow sprinkles
- 1 jar vanilla frosting, tinted into two colors
Assemble the birthday cake in a jar by placing a small amount of cake into the bottom of four small canning jars. Top with one color of frosting, a bit more cake, and the second color of frosting. Top each jar with a seal and lid. Store in the fridge for up to 2 days. Serve with candles and a lot of birthday wishes.
Want to send your cake via snail mail? Feel free to pack it tightly and pop it in the mail, but you’ll want to make sure it arrives at your destination within 3 days for maximum freshness.
Makes four cakes in jars.
Pinkalicious Cake-In-A-Jar
- 1 box strawberry cake mix, prepared according to package directions
- 1 jar strawberry frosting
- 3 pint-sized canning jars
- Pink sprinkles
Thoroughly wash and dry the inside of each canning jar. Spray the inside of each jar thoroughly with nonstick cooking spray. Set aside.
Spoon about 1 cup of cake batter into each jar. Cook one jar at a time in the microwave for 1-2 minutes, or until the cake is cooked through. Allow jars to cool slightly, then scoop the top half of cake from the jar. Plop a dollop of frosting into the center of the jar, then replace the top half of the cake back in the jar. Add enough frosting to fill the rest of the jar. Finish off with pink sprinkles.
Serve immediately or cover with a lid and store in the fridge or pop into the mail & surprise someone you love! Cakes should stay fresh in the fridge for up to 5 days, and can be mailed so long as they are topped with a canning jar lid and arrive at their final destination within 3 days.
Rainbow Cake in Jar
- 1 box white cake mix made according to package instructions
- Neon food coloring in pink, yellow, green, turquoise, and purple
- 3 one-pint canning jars
- 1 can vanilla frosting
- Rainbow sprinkles
Scoop about 1/2 cups of cake batter into five small bowls. It doesn’t have to be perfect, don’t panic if you get a little more of less of one color than another. Tint each bowl of cake batter with the food coloring until very vibrant.
Spoon about 3 tablespoons of the purple batter into the bottom of each jar. Spoon equal amounts of turquoise batter, then green, yellow, and pink. Place the jars in a shallow baking dish, add about 1/4″ in water in the baking dish. Place the baking dish in the oven and bake for 30-35 minutes.
Hot Fudge Sundae Cupcakes Chocolate Cupcakes:
4 tablespoons unsalted butter, room temperature
¾ cup light brown sugar, packed
1 teaspoon vanilla extract
1 egg
3 tablespoons unsweetened cocoa powder
¾ teaspoon baking soda
1 pinch kosher salt
¾ cups all-purpose flour
1/3 cup Greek yogurt
1/3 cup brewed coffee
1 batch homemade buttercream frosting OR Frozen Whipped Topping
Toppings:
Sprinkles
Hot fudge sauce
5 large cherries
5 8-ounce Ball Jars
1. Preheat the oven to 350ºF. Place 5 jars on a cookie sheet with space between each one and place a cupcake liner in each one.
2. Use a
3. Pour the batter into the jar until they are each about 2/3 rds full and bake them for 25 minutes, or until their tops are firm to the touch.
4. Allow the cupcakes to cool completely. Place the buttercream frosting in a pastry bag or a Ziploc bag with the corner snipped off. Twirl a large dollop of frosting on each cupcake to make it look like whipped cream. Top them with some sprinkles, a drizzle of hot fudge sauce and a cherry on top!
Red Velvet Nutella Cake-in-a-Jar
- 1 box chocolate cake mix, prepared according to package directions
- 1 teaspoon red food coloring
- 1/2 cup Nutella
- 1 jar cream cheese frosting
- 3 pint-sized canning jars
Stir the red food coloring into the prepared cake batter. Spoon about 1 cup of cake batter into each jar. Cook one jar at a time in the microwave for 1-2 minutes, or until the cake is cooked through. Allow jars to cool slightly, then scoop the top half of cake from the jar. Spoon a tablespoon or so of Nutella into the center of the jar, top with a dollop of cream cheese frosting, then replace the top half of the cake back in the jar, add another layer of Nutella, then enough frosting to fill the rest of the jar.
Serve immediately or cover with a lid and store in the fridge or pop into the mail & surprise someone you love! Cakes should stay fresh in the fridge for up to 5 days, and can be mailed so long as they are topped with a canning jar lid and arrive at their final destination within 3 days.


Comments
Post a Comment